Wednesday 28 March 2012

How to throw the best Easter get-together EVER...!!

I love everything about spring!!
From the new lambs out in the countryside, and the beautiful array of flowers that start to pop up everywhere, to the lighter evenings and first glimpses of sunshine,
but most of all I love Easter!!!


As well as the traditional egg hunts and roast dinners, tea parties, children's parties, and spring weddings are all becoming increasingly popular!

Here are my favorite bits and bobs to make yours the best spring get-together ever...


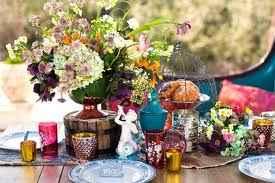
Lanterns, birdcages and vases are a timeless, chic way of introducing flashes of spring colours, using beautiful flowers, pretty ribbons, intricate glassware, and any other little gems you may come across!
Try hanging homemade lanterns in trees,
or having stunning birdcages or vases adorning buffet tables.


For a more formal occasion these beautiful decorations can double up as eyecatching centerpieces too!!


For a more child-friendly theme, but still uniquely tailored to you and your style, why not try filling
vintage cases or beautiful hat boxes with your favorite flowers?!
They're robust, come in a million different colours, and are easy to transport afterwards!

These fantastic personalised bags from notonthehighstreet.com are fab for the little'uns during their
Easter egg hunts!!


And now for the best bit...

Here are my favorite recipes for everyone's favorite Easter treats!!

Strawberry Coconutty Macaroons
(You can change this for whatever your favorite berries are! I've also added cute little sugar bows for a sugary sweet Easter feel!)


For the Coconutty Macaroons:
250g Icing Sugar
225g Caster Sugar
210g Ground Almonds
40g Desicated Coconut
5 Egg Whites (About 175g)
4 Tbsp Water
A Dash of your Favorite Colour Food Colouring

For the Strawberry Buttercream Filling:
6 Large Strawberries
125g Unsalted Butter
250g Icing Sugar

Makes 60 Macaroons
  1. Preheat the oven to 170C/325F/Gas 3. Line 4 large baking trays with greaseproof paper.
  2. To make the Coconutty Macaroons place the icing sugar, ground almonds and desicated coconut into a food processor and pulse until you have a fine dust. Sieve the mixture into a bowl, discarding anything left in the sieve, then return the mixture to the food processor. Weigh out 85g/3oz of the egg whites, add them to the food processor and blend to make a paste.
  3. Place the sugar and water in a heavy-based saucepan and heat until the sugar has dissolved and the mixture is syrupy.
  4. Whisk the remaining egg whites in a food mixer or with an electric whisk until they form soft peaks then add the colouring and gradually mix in the syrup. Continue whisking until the mixture is shiny and stiff then transfer it to a clean mixing bowl.
  5. Fold the almond mixture into the whisked egg whites with a large metal spoon then spoon the mixture into a piping bag fitted with a 1cm/½in nozzle and pipe circles about 4cm/1½in diameter onto the baking trays. Give the baking trays a couple of slams on the work surface to flatten the macaroons then bake with the oven door slightly ajar for 12 - 15 minutes or until just firm. Leave to cool on wire racks before filling.
  6. For the strawberry filling, chop the strawberries and press them through a fine sieve to make a purée. Beat the butter until soft and fluffy then whisk in the icing sugar and strawberry purée and spoon into a piping bag. Sandwich the macaroons together with a little piped filling.

Blueberry Hot Cross Buns

500g Strong White Bread-Making Flour
½ tsp Salt
2 tsp Mixed Spice
50g Caster Sugar
50g Unsalted Butter, Chopped into Cubes
200g Dried Blueberries
7g Sachet Dried Yeast
200ml Milk
2 Eggs

For the Crosses & Glaze:
3 tbsp Plain Flour
Honey or Golden Syrup

Makes 8 Buns
  1. Tip the flour into a bowl and stir in the salt, mixed spice and sugar.
  2. Rub in the butter with your fingertips. Stir in the dried blueberries, then sprinkle over the yeast and stir in. Gently warm the milk so it is hot, but still cool enough to put your finger in for a couple of seconds. Beat with the eggs, then pour into the dried ingredients.
  3. Using a blunt knife, mix the ingredients to a moist dough, then leave to soak for 5 mins. Take out of the bowl and cut the dough into 8 equal pieces.
  4. Shape the dough into buns on a floured surface. Space apart on a baking sheet, cover loosely with cling film, then leave in a warm place until half again in size. This will take 45 mins-1 hr 15 mins, depending on how warm the room is.
  5. When the buns are risen, heat oven to 220C/fan 200C/gas 7. Mix the flour with 2 tbsp water to make a paste. Pour into a plastic food bag and make a nick in one of the corners. Pipe crosses on top of each bun.
  6. Bake for 12-15 mins until risen and golden. Trim the excess cross mixture from the buns , then brush all over with honey or golden syrup. The buns will keep fresh for a day. After that they are best toasted and served with butter.

     Happy Easter!!!
Friday 23 March 2012

Going Gothic...

2012's Designer Wedding Show was all about the unusual,
with top designers Vera Wang and Vivienne Westwood using a much darker hue
with a rockier edge.


Ruffles also featured heavily in dresses in the Wang and Westwood camps, as well as in red carpet favorite Zuhair Murad's gorgeous dresses.


So if this less than traditional, gothic vibe is good enough for the likes of the stars, then it's good enough for Fit For a Queen!!
Here are some of my favorites to make Gothic the new glamorous...

Gothic doesn't have to be black!! Try browns, golds, and creams for a luxurios feel


Pastel hues, lace, and pearls are also gorgeous when used in a Gothic theme,
proving that Gothic can definitely be girly!!!


Birdcages are a dramatic, girly way of dressing any room.
Here we've used flowers, fairylights, and candles to add a touch of elegance


Add a bit of girly glamour by incorporating flocked candles, crystals, glass, mirrors, and baroque frames


Classic styles in contempory colours can add a much more understated, elegant feel to the Gothic take. Why not try black, burgundy, aubergine, or chocolate details on contempory dresses and cakes?


For more fabulous ideas and inspiring pics, visit Fit For A Queen's website!!

Tuesday 6 March 2012

Make your own Mother's Day Flowers (and they'll last forever too!!)


Here in Fit For a Queen Towers, there's nothing more that I love than gorgeous flowers, getting crafty, and treating my mum, so this cute little tissue paper bouquet is perfect for Mother's Day!!!


The best thing about this bouquet is that it comes in any colour, any shape, and any size,
so you can let your imagination run wild, it won't cost a fortune, they won't wilt after a few days, and it'll only take a couple of hours on a freezing March morning!

Here's how we made ours...

A bouquet like ours requires about 25 flowers and 10 leaves. Once you have arranged them, cover the stems in wide ribbon. You will need tissue paper, a rotary cutter or scissors, 24-gauge green cloth-covered floral wire, white craft glue in a bottle with a needle-nose tip, two Styrofoam balls (1-inch and 1 1/2-inch), artificial stamens, and green floral tape. Purchase supplies online or at crafts or floral-supply stores. If using a rotary cutter, work on a self-healing mat.

Step 1:


To make three double leaves, stack tissue in three hues of green. Cut 2-by-3-inch rectangles through all layers; fold in half. Trim tips into points; unfold. Twist each sheet at center. Fold 18-inch floral wire in half, slip over center of leaf, and twist. Fold tips toward each other, and curl.

Step 2:


Stack tissue in two hues of green. Cut 2-by-3-inch rectangles through both layers. Apply glue along the upper third of a 9-inch piece of floral wire; sandwich between tissue layers. Let dry. Cut a leaf shape. Separate layers of tissue.

Step 3:


Cut several 1 3/4-by-2 3/4-inch and 1 1/4-by-2-inch rectangles from tissue paper; fold each in half lengthwise; cut one end to be rounded, and twist other end to shape. For the center, roll white tissue paper into a tiny ball; cut out a square from white tissue paper, and wrap it around the ball, twisting tissue at its base. Attach the twisted end of the ball to a piece of floral wire by wrapping with green floral tape; add petals one at a time (start with small petals and end with large ones), taping twisted ends onto floral wire. Trim floral tape; spread out petals.

Step 4:


Each bloom requires 12 (or six pairs) stamens attached to floral wire with floral tape and five 4-by-2 1/4-inch pieces of tissue paper. For each petal, wrap tissue halfway around 1 1/2-inch Styrofoam ball, forming a half-sphere; twist ends, and remove ball. Attach one end of a petal to the base of stamen with floral tape. Add the other petals one at a time. Trim pointy ends. Gently pull petals away from center.

Step 5:


Cut a 16-by-3 1/2-inch strip of tissue paper; make 2-inch accordion folds. Trim and notch one end of tissue through all layers, as shown; unfold. Insert floral wire into a 1-inch Styrofoam ball; place ball near bottom of tissue strip. Roll tissue around ball; twist bottom. Remove the ball with tweezers. Wrap floral tape around the twisted tissue and wire. Trim the floral tape.

Step 6:

You're almost there now!!!


Cut a 16-by-3 1/2-inch strip of tissue paper; make 2-inch-wide accordion folds. Make 3-inch-deep snips in tissue to create fringe. Wrap unfringed end around floral wire. Secure with floral tape. Run scissors blade along pieces of fringe to curl; fluff.

And Hey Presto, You've got yourself a beautiful bouquet!!! Now just bound with some pretty ribbon and you're all done!

Happy Mother's Day
xxx